I have been super busy this past month or so, and not much time to blog about anything.
I thought I would share some sunrise and sunset photos. In my opinion there is nothing more relaxing than watching a picturesque sunset on a lazy summer evening. Nothing brings a sense of optimism that the coming day will be a good one, that a beautiful sunrise does.
I have previously mentioned in this blog of my interest in antiques, especially functional ones. I love that fact that items such as old cars, telephones, toys, tube radios etc. can not only be admired, but can be made to work as they did when the were new. Recently this interest has lead me to another area of household antiques, that being electric clocks.
Circa 1937 Telechron Electric Clock - "The Pharaoh", Model 4F61
Over the past few months, I began purchasing some antique clocks and doing some research on how to restore them. Through this research, I happened to stumble across a wonderful book called "Electrifying Time" by Jim Linz. Much of the information below appeared in one form or another in this great book, documenting Telechron and General Electric and the history of the electric clock.
Electric clocks had their heyday in the 1930's, 40's and 50's, replacing the spring and pendulum clocks as the primary time keeping mechanism for the general public. Later in the 1960's these electric clocks were then displaced by a cheaper and quieter battery operated quartz clock technology. Henry Warren and his company "Warren Telechron" (and General Electric) were THE leading manufacturers of electric clocks during this era. Millions and millions were produced. You or your parents probably owned one. If you have ever seen a clock radio from the 1940's or 50's then you have seen a Telechron clock. All clock radios of that era used Telechron clocks. I remember as as a kid having a noisy electric clock in our living room. Nowadays, electric clocks have gone way of the rotary phone and Tang !
Henry Warren, Inventor
If Warren were ONLY the president of a major clock company that existed over 60 years ago he really wouldn't be all that interesting. However, Warren contribution to OUR day to day life was much bigger than this, and is still relevant even though no one knows who he is or what a Telechron clock was. For Warren's real contribution to modern society was that his invention made it possible for the linking and sharing of electric power between electrical generation stations, and help set up the modern electric "grid" that we know today.
All of this started because Henry Warren was an inventor. He had a passion for time, and wanted to invent a reliable battery operated clock. Around 100 years ago, in the 1910's Henry Warren founded the Warren Clock Company, which later became the Warren Telechron company. Then around the year 1912 Warren came up with a design and was granted a patent for a battery operated electric clock. Although the clock worked well it was a commercial failure. This is because of the size and reliability of battery technology at the time. Batteries in those days were bulky and heavy (see below) and would only hold a charge for several hours. Warren was correct about battery operated clocks, but he lived in the wrong era. His clocks were a failure because they were too far ahead of their time. Effective battery operated clocks would have to wait until the 1960's to be practical. Ironically, battery operated clocks replaced the electric clocks that he and his company became so famous for.
Far Left, Example of a battery from the 1920's. Far right, a modern 9V battery.
With battery powered clocks found impractical, Warren next turned his attention to electricity to power his clocks. He designed and built an accurate clock motor that would run on the standard current of that time (and our time) 60 Hz Alternating Current (AC). AC electricity consists current in waves with peaks and valleys (up down up down). 60 Hz means that there are 60 peaks and valley's that occur in 1 second. Warrens electric clock motor relied on the fact that the current begin generated was synchronized EXACTLY at 60 Hz.
Diagram of Alternating Current. Peak to Peak is 1 cycle. Normal Household current is 60 cycles per second (Hz)
Warren built a number of clocks but found that at times the clocks either ran too fast (gained time) or too slow (lost time). After a number of experiments he discovered that it was not his clocks or clock motors at fault it was the quality of the electricity that was being produced by power company.
Warren then went to work to try to not only convince the power companies that there was something wrong with the way they were generating electricity, but also to invent another machine to help solve the problem. The machine he invented was a type of "regulator", a mechanism which could be used at a power generation plant to control the speed of the generators (increase or decrease their speed) in order to produce a steady 60 Hz AC current.
His invention was called a "master clock" regulator and worked as follows. There were two clocks in the device. The first was a very accurate pendulum clock which would keep the "master time" The second clock was one of Warrens Electric clocks synchronize to keep accurate time at a 60 Hz frequency. His electric clock would be connected to the current being produced by the power plant. If the electric clock lost time compared to the master clock, the generators were running too slow and needed to be sped up. If the electric clock was gaining time the generators were running too fast and needed to be slowed down. Warren's Master Clock allowed the speed of the generators to be regulated to produce a current with a steady output of exactly 60 Hz.
Warren "Master Clock" to regulate frequency of generated electric current
Warren convinced the Boston Electric Company to install his "master clock" regulator at their power plant in 1916 and the tests were successful. Soon other power companies followed and purchased his regulator. The regulation of the production of power was a very big thing. Up until that point it was impractical (and very expensive) to share power between two generating plants because of the difference in frequency of the power being produced. Having all the power generation on a single universal frequency (60 Hz AC) allowed the sharing of power and help set up the electrical grid that we now know today in this country and the North American continent.
Multiple sources of electric generation on the same electrical grid.
The second but equally important benefit of universal power generation cannot be understated. For the first time, electrical appliances made for one region of the country could be used in another region of the country. Think about this for a second. You purchase a radio (or toaster) in New York, you travel to Philadelphia less than 100 miles away, and your radio does not work because the current is different. This was a tremendous deal. It allowed for the electrification of the nation, because now electric appliances could work anywhere in the country.
A toaster purchased in New York might not work in Philadelphia
The General Electric Company (you might have heard of them) took notice of Warren's "master clock" and it's effect on the power generation of the nation and purchased a 49% interest in the Warren (Telechron) Clock Company. For the next 40 years both Telechron and General Electric dominated the electric clock market.
With a uniform power grid now in place, electric clocks became practical. The production of electric clocks went from 87 thousand in 1927 to 4.3 million in 1937. Corresponding the sale of wind up clocks went down from 2.4 to 1.5 million in the same time period.
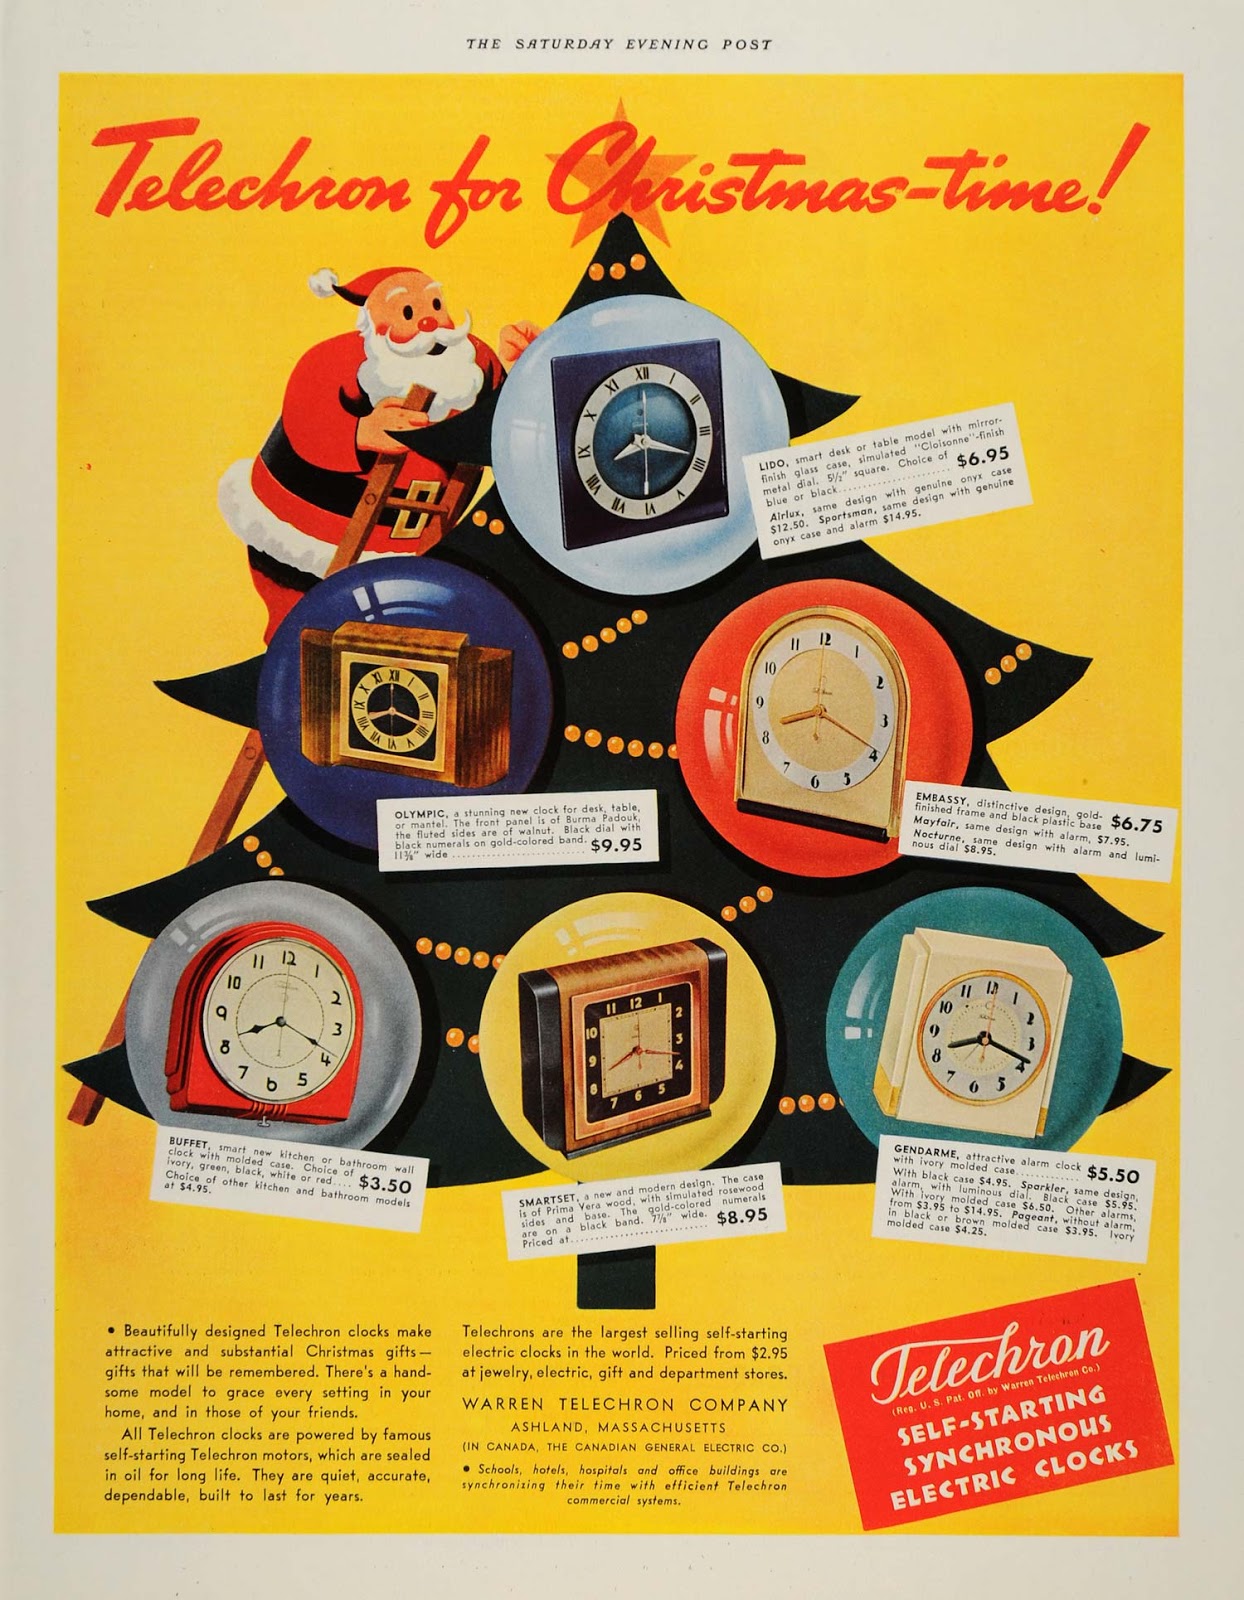
Advertisement for Telechron Clocks
Telechron Christmas 1937 Ad
Telechron "Quacker" 1937 - Novelty Clock. Not part of my collection, but I wish I had one.
From the 1920's into the 1950's all General Electric and Telechron Clocks were made in the Telechron factories in Ashland Massetusetts. We will cover more of this history of General Electric and Telechron clocks in a later post. Below are some examples from my own personal collection of GE and Telechron clocks from the 1920's through late 1940's in both restored and un-restored condition.
The Shefiield , 1937-39 (Model 5B53)
The Snug, 1941 - Model 3H95
Pre-war version of the Pharaoh, 1937 - 4F61
The post-war version of the Pharaoh, 1946 - 3H151 (About 2/3 the size of the pre-war model)
Photography has been a hobby of mine for many years. I remember taking pictures as a kid with an old hand me down camera, a Kodak Brownie Starflash, which had been my mother's. In the era of flash cubes, this camera still used flash bulbs, which luckily were still available at the time. It also used non standard Kodak type 127 rolled film [a popular film size in the 1940's and 50's, but this was the early 1970's]. This type of film had to be manually loaded from one spool to another, and manually advanced using the numbers that showed up in the little red viewer on the back of the camera [Remember those days kids ! :-D ]
Later, I saved and purchased Kodak's Instant camera, which was Kodak's answer to the Polaroid for "instant" pictures. But like many things in my life, it turned out that I purchased the wrong technology, (HD-DVD player as the latest example of this particular skill ... but that is a different story ...). Polaroid sued Kodak for copyright infringement and won, as part of the settlement, Kodak had to stop selling this type of Camera AND STOP MAKING FILM FOR THIS CAMERA, sending all their instant cameras to an early grave. It wasn't until the last few years where I "graduated" to a big boy Digital Single Lens Reflex (DSLR) camera, a Canon EOS 60D. It has been a great camera, and there has been no looking back.
One reason I love the digital age of photography so much is cost or the lack there of. For digital photography, except for the upfront cost of equipment , there is no cost of film. You can shoot and make as many poor shots as you want to get that one good shot. Recently I took photographs for a school play and took somewhere in the neighborhood of 1500 shots before during and after the play. That is the equivalent of 62 rolls of 24 exposure film. I managed to distill these down to the "best" 400 or so images [17 rolls] after cropping and retouching. LOL. ...... but, I digress ....
Recently I saw an article posted on Facebook on astrophotography, that is photographs of astronomical object (moon, planets, stars, sun) mainly at night. Upon reading the article, I discovered something that I did not know, namely, you don't need to have a telescope or a tracking mount to take quality pictures of the night time sky. I was intrigued and began to explore.
This is the first of possibly several articles outlining what I know about the subject, a beginners guide written by a beginner. I will try and update this blog when better info and more experience becomes available. I will also try and correcting information which I thought was true, but found out later not to be so.
Here is the basic (minimum) equipment you need for astrophotography
A camera which will allow you control shutter speed (i.e. how long the shutter stays open)
A camera which will allow for remote control of the shutter.
A remote control for shutter release
A tripod
A computer (to run stacking software [I use DeepSkyStacker] & later do image processing on the "stacked" image)
patients
The ability to make mistakes and learn from those mistakes and not give up when the going get tough !
The basic theory behind tripod astrophotography is as follows.
Take lots of long exposure images of the same portion of the sky. Use software to align the stars and "stack" a bunch of aligned images into one composite image. Remove the noise from the composite image and finally post-process the composite image to bring out more detail.
Now lets try to fill in some details.
Earth Rotation, Star Trails and the "Rule" of 600.
There is no getting around this one people, the earth rotates. If you take a long exposure image (say leaving the shutter open for 1 or 2 minutes) the stars will appear as streaks in your image. as shown below
This is happening because in the time that the shutter has been left open, the earth has rotated enough to cause the stars to "move" in the sky. Now there is an entire class of images using this technique and they can produce some wonderful images. I may explore this technique in some later post, but for now, I am going to assume that we are after crisp images of the night sky where the stars are not streaking.
We are left with a conundrum. Stars, galaxies and planets are inherently faint objects to try and photograph, so we want to capture as much light as possible for a detailed image. In order to capture enough light, we need to leave the shutter open for many seconds or minutes. However the earth's rotation will cause streaking if we leave our shutter open for too long a period of time. What to do ?
We can either buy an expensive tracking mount, to compensate for the earth's rotation and leave the camera shutter open for long periods of time, or we can some how figure out what is the maximum time we can leave the shutter open before stars begin to streak. We will choose the later.
In this case we use the "Rule of 600". Generally speaking take the focal length in mm that your lens is set to (for adjustable lenses this will usually be, between 18 mm and 55 mm or perhaps 18 mm- 135 mm). Lets say that we set the lens to be 50 mm. We use the equation below to compute the maximum exposure time before stars will begin to show streaks in the image.
Rule of 600 Max Exposure Time = 600 / Focal Length (in mm)
Max Exposure Time = 600/ 50 mm
Max Exposure Time = 12 seconds
Thus in general the maximum exposure time that we can have for any single image (on a fixed tripod) at 50 mm focal length would be 12 seconds.
Setting up the camera
I am going to assume for a second that you are using a Canon DSLR. I will most likely modify the instructions to include things such as pocket camera, etc. in the future, but to assist me in getting this information down on the page I will assume that you have my setup. Let us also assume that we will be using a focal length of 30 mm (a rather wide field of view) to take pictures of the sky.
Put the camera into manual mode and bring up the summary screen on the back panel of the camera. Then do the following:
Change the ISO to 1600
Change the aperture (F Setting) to the lowest number it will go (Like F5.6, F5.0, etc.)
Change the Exposure Time to your maximum exposure time using the Rule of 600. In our case (30 mm focal length) this would be 20 seconds.
Change the picture taking type from single shot to remote/2 second delay
Change lighting from AWB (auto white balance) to Tungsten Lights
Change output format from jpeg to RAW or RAW and jpeg
You are now ready to mount your camera on your tripod.
Where are the stars
There are a lot of online programs to show star maps. Here is one of them
Enter your location and identify what objects are where in the sky. Print out the map if you want or need to. Or conversely, you can just go outside and if you have a knowledge of constellations, choose your target in real time.
Example of an online map of the sky. The grey in the image represents the Milky Way
Light Pollution, Dark Skies, Moonlight
OK people, darker is better. We want dark skies, away from the cities, street lights, house lights, etc. Less light pollution will mean better images. Where I live (in central PA), we are considered "country" by many standards, but we even have light pollution.
Try finding a secluded spot, shoot away from the light pollution. Try to shoot when the moon isn't out, or at least not in the direction you are trying to take pictures.
If you are taking images from your back yard [which I do, and I know it isn't the best], turn off the light in the house (or at least the ones that are shining on the camera).
Light kills (image quality) ..... LOL
Tripod, Aiming and Focusing
For now let us keep things simple.
Set up your tripod, but don't extend the bottom section of the legs. You want your tripod rock solid with no movement of the camera. The "pros" recommend an expensive tripod mount in the hundred of dollars. I don't have that kind, mine is a $30-$50 tripod that I have had for years. You might want to hang a weight from the center of the tripod so it just touches the ground. Again the "experts" say this will help. I haven't done so yet, but some of my pictures do suffer camera jitter (making them useless) so I may try this in the future.
Attach your camera to the mount on the tripod, select an area of the sky that you would like to shoot.
Now comes the critical part of focus.
Ultimately, you will need to take your camera out of auto focus mode into manual focus mode. This is a switch on the side of the lens. (MF/AF).
Note: Focusing is the single most important thing. It cannot be corrected after the fact. It is difficult to get it right, but it is also crucial. For beginners (like me), the auto focus method is almost fool proof. I have had many a star taking session rendered useless because my images are out of focus. It will happen to you as well. Just know this in advance and try to find a method that works for you.
Focusing: Using Auto Focus
One way to focus is to use auto focus to focus on an image at infinity. Like say the moon. If you can do that, great. Once you are done, put the camera on manual focus and don't touch the focus ring.
The Moon is an excellent object to "Auto Focus" on.
As noted before, having the moon present during an astro-photo shoot is not necessarily the best thing because of all the light that will bleed into the background of the image.
Focusing: Manual Focus and Test Images
If you cannot use auto focus to focus your image then put your camera in Manual Focus mode, point to the sky and turn the manual focus ring on the lens to one end and then back it off a little bit [most new lenses actually focus beyond infinity. Now using your remote control. Take a picture (for 20 seconds using your pre-programmed manual mode setup). Look at the picture on the LCD panel at the back of the camera. Zoom in. Are the stars round and in focus or fuzzy. If fuzzy, then you need to adjust your focus a little in either direction. Keep doing this until you feel you have the best focus possible.
It may take a while, but as I said before, Focus is critical !
Also, once in focus, do the stars appear sausage shape and not round. If so (and in focus) then your exposure time is too long and you will need to reduce the number of second the shutter can stay open. If this is the case go down from 20 second to 15 or 18 seconds.
Other Methods:
There are various other methods, including using the "live view" mode on LCD view screen panel, with the zoom function. When I become more familiar with them, I will include them in this article.
Finally Taking Pictures of the Stars
If you have made it this far, congratulations. You next step is the actually take pictures of the stars. For your first time out take at least 10 images and I would say take 20 or 30 images. All these images will be used to "stack" your data during processing in the next phase.
If you wish to take images of different portions of the sky (or change your zoom factor [focal length]), Mark this on your camera by taking an image with your hand covering the lens (don't touch the focus ring though).
Here is an example (untouched) of a single star frame.
Raw unprocess unstacked single image (frame) that contains the Milky Way
Other Images:
When you are done with your star pictures you need to take some dark and flat images. These images will be used by the stacking software to remove noise from your star ("light") images.
dark files:
Using the same settings (ISO, shutter speed, aperture) as your star images, put the lens cap on and take 20 images. These are your dark files and will be used to filter out camera noise, "hot pixels" with the stacking software.
flat files:
Using the same ISO setting as your star images, set the shutter speed as fast as it can be (for the Canon 60D this is 1/8000 of a second). Put the lens cap on and take 20 images. These will be used in the stackin operation to again reduce sensor noise.
Stacking Software:
We next come to the computer part of our exercise. For this I use a freeware program which is called Deep Sky Stacker (DSS). This is a program that runs on the Windows operating system, and it can be found at the following link:
Here also is a link for the users group, which also has the latest beta version.
main window for DeepSkyStacker windows program
Deep Sky Stacker is a program which detects stars within each image, aligns the images, and adds the images together (stack them), so that faint, almost undetectable stars, nebula's, galaxies become visible. By adding images together (mathematically) you essentially are increasing your exposure time of your image, and thus able to see more details. It also through the use of flat files and dark files reduce the noise in the final image.
From a scientific standpoint you are increasing the signal to noise ratio by:
Increasing the signal [stacking] ..and..
reducing the noise [dark & flat frames].
I will eventually include much more detail about DSS, for now I refer you to this article which outlines step by step how to use the software.
Basically, the steps for using the program are as follows:
Click on "Open Picture Files" located on upper left of window. Select your star images (either jpeg or RAW)
Click on "Dark Files" and select your dark file images
Click on "Flat Files" and select your flat file images
Click on "Check All" to select all images for processing
Click on "Register Checked Pictures"
Click on the "advanced Tab" Move the slider bar to somewhere between 10 and 30 and click on "Compute the Number of Detected Star". If this number is around 50 you are good. Higher or lower, adjust the slider and recompute.
Once you have done this click OK and let the stacking begin. [There are many more parameters you could adjust but for simplicity sake, keep the defaults for now]
This might take a while depending on the quality of the images and the quantity of images any where from 15 minutes to a couple of hours.
When the stacking is complete it will display an image on the screen. Click on "Save Picture To File" on the left hand side. jpeg format is not an option, so you must save this as a TIFF image.
Note: The "official" version of the program (Version 3.3.2) is having problem reading in the RAW format of the Canon camera and will only work with jpeg images. The beta version found on the DSS users group page will work with the RAW format. Initially I suggest using jpeg images and when you are comfortable with the program you can download the beta version for use with RAW images.
Image Processing:
Apart from getting quality images, this is one of the most important steps, and I must admit the one that I am weakest at. Basically you need to do 2 things
Find a dark non starry patch in the image and set this as the base color
Adjust the curve of the rest of the image to bring out the stars, gas clouds etc. without making the entire image too bright.
Many people use Photoshop and Photoshop like programs for this step. I don't own a copy of Photoshop however. The TIFF images used for processing are 16 bits for each of the Red, Green and Blue layers.
I use a freeware program called GIMP. The problem with this is that it only processes the data (RGB) in 8 bits per channel, thus I lose a great deal of resolution. However this is the best I can do for now.
Here is an article on some suggestions on how to do some final image processing on the images coming out of DSS.
For comparison sake here is a single unprocessed image vs a stacked fully processed image for a star field.
Lastly here is a fully registered stacked and post processed image showing part of the Milky Way gas cloud. This was obtained from 30 images of 10 second exposure each, at ISO 1600. So far this is my best final image. This was probably my 5th or 6th photography session ever and I was very happy with the results.
Odds and Ends
If you want some more information and have about 20 minutes, here is a very informative youtube video that shows the entire process of picture taking, stacking and post processing. If you are actually interested in doing astrophotography, I highly recommend this video.
Summing it all up:
This has been a very brief overview on backyard astrophotography. I am not an expert, nor do I play one on TV. I am learning along the way, making some mistakes, but certainly having a lot of fun doing it ! I will update this page as my knowledge and techniques become more refined so check back every so often.
My goal is mainly to have fun, but also to take some interesting images. Once I refine my techniques I will be attempting to photograph some deep sky objects like the Andromeda galaxy and the whirlpool galaxy, along with the Orion nebula. Everyone needs a goal.
Now get out there and take some images and enjoy yourself !