Snow Luminaries: A How-To Guide

The recent snowfall around my area, plus the proximity of Christmas and New Years is the inspiration for this current blog post. I will try to illustrate in words and pictures the simple steps of making snow luminaries.
First, give credit where credit is due. I did not come up with this procedure myself, rather I read an article a number of years ago in the December 1996 issue of Yankee Magazine which described the process. Over the years, based upon real life experience, I have modified the steps slightly.
This is a family tradition, (snow permitting) that we try to do if the weather cooperates at either Christmas Eve, Christmas Night, New Years Eve, New Years Night.
The items you will need are common house hold items. These are


 |
| December 1996 Edition of Yankee Magazine |
First, give credit where credit is due. I did not come up with this procedure myself, rather I read an article a number of years ago in the December 1996 issue of Yankee Magazine which described the process. Over the years, based upon real life experience, I have modified the steps slightly.
This is a family tradition, (snow permitting) that we try to do if the weather cooperates at either Christmas Eve, Christmas Night, New Years Eve, New Years Night.
The items you will need are common house hold items. These are
- A plastic or metal bucket
- A small shovel to shovel snow into the bucket
- A table spoon
- (option) A garden trough
- Candles (1 for each Luminary)
- Matches or other type of lighter
Step 1: Fill the bucket with Snow

Step 2: Pack the Snow Down Tight
If the snow is powdery, then you might have to add some water to the snow in the bucket to make the snow "wet"

Step 3: Invert the bucket at the desire location of the luminary
You might have to "slam it down" onto the ground and also "tap" the top and sides so that the snow does not stick into the bucket. This is basically the same idea as a sand and pail at the beach, but you are using snow.
Step 4: Begin to Hollow out the middle of the luminary.
For this step you will use the table spoon. go down at least 1/2 to 2/3 of the way down. Hollow out the side as well so that you have about 1.5" to 2" left on the sides. You want to be able to easily stick your hand in the hollowed out part, because you will need to stick a candle inside the luminary, and also light the candle. You also probably want to have a flat surface at the bottom so that the candle can rest relatively level on the bottom of the luminary.
The thinner the walls of the luminary, the more that the luminaries will "glow" when a candle is lit. It is a fine line between too thick and too thin. Too thin and your entire luminary may collapse.
The thinner the walls of the luminary, the more that the luminaries will "glow" when a candle is lit. It is a fine line between too thick and too thin. Too thin and your entire luminary may collapse.
The theory goes, the deeper the cavity, the more protected from the wind the candles will be, and thus be less likely to blow out.


Step 5: Repeat as necessary to make as many luminaries as you want
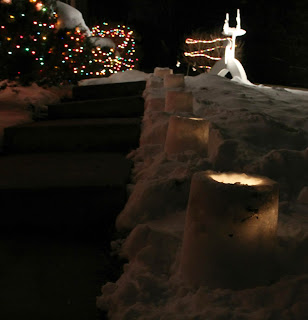
When we make snow luminaries, we usually will line both sides of the driveway and also the walkway leading up to the house.


Step 6: Insert Candles into each luminary and light
You might want to wait until at least twilight for this step. We use pillar candles that we can get in bulk from Wal-Mart. In a pinch we also have used tea-light candles although they will burn out quicker. To light the candles, we will sometimes light the first candle and then use it, to light all the other candles. Do what works best for you.
The nice thing about snow luminaries is the relative safety. If the candle tips over, there is nothing to burn except snow which of course doesn't burn.

Step 7: Enjoy you safe Festive Light Show


No comments:
Post a Comment